| Indice |
| BeOS bitmap vs. Haiku vector icons Icons are attributes Creating icons with Icon-O-Matic Path Shape Style Transformer Saving an icon Tips & Tricks |
 Icon-O-Matic
| Deskbar: | ||
| Percorso: | /boot/system/apps/Icon-O-Matic | |
| Impostazioni: | ~/config/settings/Icon-O-Matic |
Prima di passare alla effettiva creazione di icone in Icon-O-Matic, ecco un paio di parole sulle icone di Haiku in generale.
 Le bitmap di BeOS vs. le icone vettoriali di Haiku
Contrariamente a BeOS, Haiku utilizza icone vettoriali al posto delle icone bitmap. È stato sviluppato uno speciale Formato di Icone Vettoriali per Haiku (HVIF) che è altamente ottimizzato per file di piccole dimensioni e per un rendering veloce. Ecco perché la maggior parte delle nostre icone sono molto più piccole di una bitmap o del più ampiamente usato formato SVG. Inoltre, a differenza delle icone bitmap di BeOS, Haiku non si limita a una tavolozza 8 bit (256 colori).
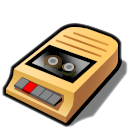
Prendete questa icona del terminale, ad esempio:
| Bitmap | SVG | HVIF |
| 1,024 byte + 256 byte | 7,192 byte | 768 byte |
Notare che BeOS ha usato due versioni della stessa icona, una di 16x16 e l'altra di 32x32, per ottenere buone visualizzazioni in modalità lista e in modalità visuale icone.
Questo trucco non è necessario con icone vettoriali. Oltre ad occupare solo poche centinaia di byte in un file, le icone vettoriali scalano molto meglio di quelle bitmap. (Nota: BeOS offre solo una visualizzazione 16x16 e una 32x32.)
| 16x16 | 32x32 | 64x64 | 128x128 | |
| Bitmap |  |
 | ||
| Vector |  |
 |
Le icone sono attributi
Le icone sono archiviate come un attributo con i loro file. Tuttavia, ciò non significa che ogni file deve avere questo attributo per apparire con un'icona in una finestra del Tracker: i file di dati ereditano la loro icona dal loro tipo di file. Per cambiare globalmente l'icona del tipo di file utilizzazre le preferenze dei FileType. Se si vuole aggiungere soltanto un'icona speciale per un singolo file, si utilizza invece il FileType Add-On su di essa. Vedere il documento Filetypes per maggiori informazioni.
Creare icone con Icon-O-Matic
Icon-O-Matic è l'editor di icone di Haiku che può salvare il fle come HVIF, SVG o PNG. L'icona può anche essere collegata direttamente come attributo a un file esistente o esportata come file di risorse o come sorgente utilizzato dagli sviluppatori. Dato che l'applicazione è stata ottimizzata su misura per il formato HVIF, il suo uso riflette il funzionamento interno di questo formato.
Other than your normal vector graphics software, you don't deal with separate objects that each include all their specific properties like path, stroke width, stroke and fill color etc. Rather, you assemble your objects ("shapes") from shared paths and colors ("styles") and set certain properties. This re-using of elements is one secret of HVIF's efficiency. Although that imposes some constraints on the icon designer, there are a few advantages, too.
For example, by re-using a path, several objects can be modified together by manipulating this one path. Think of an object and its shadow. Modifying their shared path will change the object itself and automatically its (maybe slightly distorted/translated) shadow.
Ecco una rapida panoramica della finestra di Icon-O-Matic:
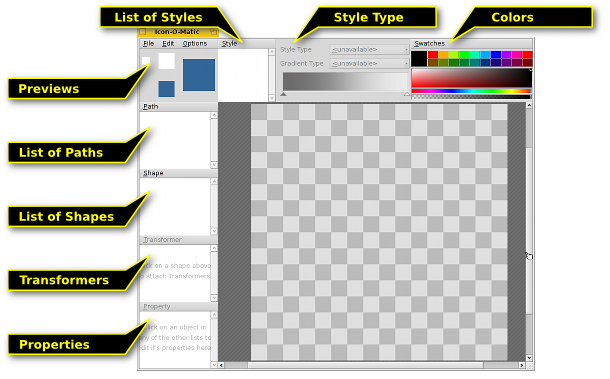
Per creare qualsiasi oggetto visibile nella finestra di disegno, è necessaria una forma con un percorso e uno stile. È possibile crearli comodamente tutti insieme o anche uno per volta dal menù . Ogni tipo di oggetto (Percorso, Forma, Transformatore, e Stile) ha un menù sopra la propria lista degli elementi, che offrono vari comandi. Ogni elemento ha alcune opzioni che vengono impostate dal menù .
Percorso
Un percorso è costituito da diversi punti che sono collegati con linee e curve di Bezier. Per aggiungere o modificare i punti, assicurarsi che il percorso sia selezionato nella lista dei percorsi.
Basta cliccare sulla finestra di disegno per posizionare il primo punto. Nell'atto di posizionare un punto, si decide se la linea risultante sarà dritta o curva: basta cliccare una volta e rilasciare per una linea retta, oppure tenere premuto il tasto del mouse e muoverlo per trascinare le maniglie di una curva di Bezier. Naturalmente, sarà possibile effettuare modifiche in seguito.
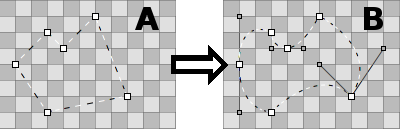
To get from "A" to "B", you have to transform some points from corner-points to curve-points. That's done by holding ALT while clicking on a point and dragging out the handles. This results in a symmetrical Bezier: the second handle follows the movement of the other. If you need to move the handles independently, again click & drag on a Bezier handle while holding ALT.
Vice versa, to go from Bezier to a corner-point, hold ALT and click on a point.
To move a point, simply click & drag it. To select more than one point, hold down SHIFT and draw a selection rectangle. Selected points are marked with a red border instead of the usual black.
To insert a point into a path you click on the connecting line between two points.
Selected points are deleted by pressing DEL or by clicking on any point while holding CTRL.
Il puntatore del mouse indica le seguenti modalità:
| Move point(s) | Insert point | Add point | Delete point CTRL |
Corner↔Bezier ALT |
Select points SHIFT |
È possibile richiamare un menu contestuale cliccando col tasto destro su un punto o una selezione di punti:
| ALT A | Seleziona tutti i punti del percorso corrente. | |
| T | Pone tutti i punti selezionati in una casella di trasformazione in modo da poterli muovere, ridimensionare o ruotare contemporaneamente. Funziona come per le forme, descritte più avanti. | |
| Divide i punti selezionati in due, uno sopra all'altro. | ||
| Ruota i punti selezionati di 180°. Applicabile solamente ai punti Bezier. | ||
| DEL | Elimina i punti selezionati. |
Menù percorso
Il menù offre poche ovvie voci per e o per o un percorso. Qui di seguito sono riportate quelle voci che potrebbero necessitare di qualche spiegazione in più:
| If your path isn't "closed" (see Path Properties below), a click into the canvas always creates a new point, connecting it with the last one. "Reverse" will reverse this order and your new point will connect to original start point instead. | ||
| Most useful with imported SVGs, this function will remove redundant points. | ||
| ALT R | Practically, this rotates the opening of a path. It's best seen when using a not-closed path with a style and a shape with a stroke transformer. Now, if your path looks like a ⊂ it will rotate like this: ⊂ ∩ ⊃ ∪. | |
| ALT SHIFT R | Fa la stessa cosa nell'altra direzione. |
Proprietà del percorso
Le in basso a sinistra della finestra mostrano tutte le impostazioni disponibili per gli oggetti correntemente selezionati. Un percorso ne ha solo due: un e se è o meno.
Shape
A shape groups together one or more paths with a style. Practically, it's the object that you'll actually see on the canvas. The grouping is done with the checkboxes in front of the paths and styles: Just select your shape and tick off the desired path(s) and a style.
A shape defines how a path and style is applied, e.g. if the object is filled or only stroked (which is done by using Transformers on the shape, we'll get to that later). Also, a shape can be moved, rotated or resized without touching the used path. That way, you can re-use a single path and get different, but related, shapes.
When a shape is selected from the list, a rectangle is drawn around it. Depending on where exactly you grab it, the shape is moved, resized or rotated around a point in its center, which itself can be moved. Holding SHIFT will lock direction when moving, limit rotating to 45° angles and restrict the aspect ratio while resizing. The mouse pointer again indicates the current mode:
| Move | Resize | Rotate | Move rotation point |
Shapes lie on top of each other, each is on its own layer, if you will. To reorder them you drag & drop their entry to a different position in the list.
Shape Menu
The menu offers the before mentioned possibility to and to or a shape. Then, there is:
| Reverts all the move, resize and rotate transformations you have applied to the shape. | ||
| When you transform a shape, its assigned path(s) stay in their original position. This may be intended; maybe more than one shape is using that path, maybe you intentionally used to set the points at precise pixel borders. If not, "Freeze transformation" will apply the current shape transformation to the assigned path(s). A future "Reset Transformation" will then return to this new state. |
Proprietà delle forme
Accanto al , la visuale per le forme ha le seguenti opzioni:
| Livello minimo di dettaglio | ||
| Livello massimo di dettaglio |
Livello di Dettaglio (LOD)
| 16x16 | 32x32 | 64x64 |
See how there are no numbers in the 16px version of the BeVexed icon? That's done with the "Level of Detail" setting of their shapes.
With the LOD you control the visibility of a shape depending on its size. That way, you can leave away details of an icon that look good on a bigger icon, but maybe not so much on its smaller version.
This is how it works: A LOD of 1.0 is defined as a 64px icon size. To get the LOD of a particular icon size you simply divide it by 64, e.g. a 16px icon has a LOD of 16/64 = 0.25. A shape won't be visible below its and above its .
So, if you set a shape's to 0.0 and the to 0.5, this means that the shape will only be visible for icon sizes smaller or equal to 32px. If you wanted to exclude the 32px icon size, you'd have to stay below 0.5, say 0.49.
The LOD is not only for leaving out detailing shapes, but also to e.g. change the stroke width at different sizes, if you feel that's needed. Simply duplicate a shape, make your changes and set both of their LOD settings to show either one or the other. Here lies the only source of potential confusion, when you unwittingly overlap LODs of shapes, and wonder why at some size both are visible…
For example, if Shape 1 were to be shown below 48px and Shape 2 from 48px upward (LOD: 48/64 = 0.75):
| OK | Non OK! | ||||
| Forma 1 | Min LOD | 0.00 | Min LOD | 0.00 | |
| Max LOD | 0.74 | Max LOD | 0.75 | ||
| Forma 2 | Min LOD | 0.75 | Min LOD | 0.75 | |
| Max LOD | 4.00 | Max LOD | 4.00 | ||
Stile
Uno stile può essere dato un colore pieno oppure da alcuni tipi di gradiente.
Oltre ai colori predefiniti sotto , è possibile crearne di propri facendo clic sul colore corrente. Inoltre, si faccia caso al cursore sotto lo spettro di colori, questo serve per impostare il canale alfa (trasparenza).

È possibile creare rapidamente un nuovo stile semplicemente mescolando il colore e trascinandolo all'interno della lista degli stili.
If you go for a gradient, you set the type (, , , ) and then define the start and end colors. This is done with a drag & drop from a color bucket into the respective color indicator under the gradient.
Of course you can move these indicators to change the gradient to your liking. You can also insert more indicators to add more colors by double-clicking into the gradient. Pressing DEL removes the selected indicator.
You can move, resize and rotate the representing box of a gradient on the canvas until it fits your needs. This works just like with shapes.
Menu Stile
The menu offers the usual entries to , or a style and to .
Proprietà dello Stile
The is the only of a style.
Trasformatori
A shape can have Transformers which change its appearance. The effects, however, are more subtle than a truck turning into a battle robot…
Transformer Add Menu
| Adds an outline to a shape. | ||
| Strokes the path of a shape instead of filling it with a style. |
Depending on the kind of Transformer, you'll get a different set of properties.
Transformer Properties
Besides a and the actual for the transformer, the view has these (depending on its type slightly differing) options:
| Stroke only. Defines the end caps of a line: , or . | ||
| Contour only. Determines if the contour is to the inside or outside the path. | ||
| Defines how lines are joined at a point: , or . | ||
| Only when the above is set to "Miter" this setting influences the looks of the miter joint. |
Salvare un'icona
Anche qui in alto c'è la solita barra con , , . L'utilizzo è piuttosto intuitivo, pertanto si presterà attenzione soltanto a come salvare un lavoro.
will save in a special Icon-O-Matic format that retains additional information like the names of paths, shapes and styles. These will be stripped from the actual icon once you export it to save space. It's a good idea to back-up your work like this, because without named objects everything's named "<path>/<shape>/<style>" which makes specific changes tedious.
opens a familiar save panel with a file format pop-up menu at the bottom, offering these choices:
| HVIF | Haiku Vector Icon Format | |
| HVIF RDef | Salva come risorsa utilizzata dai programmatori | |
| Codice sorgente HVIF | Salva come codice sorgente utilizzato dai programmatori | |
| SVG | Salva come SVG | |
| PNG | Salva come PNG di 64px di dimensioni | |
| Set di PNG | Salva come PNG di 16, 32 e 64px di dimensioni | |
| BEOS:ICON attribute | Choose a file and set its icon attribute directly | |
| META:ICON attribute | Choose a file and attach the icon as mere meta data |
Consigli e trucchetti
Di seguito alcune cose che bisognerebbe tenere a mente quando si lavora con Icon-O-Matic e alcuni consigli per il suo utilizzo:
Read the Icon Guidelines to learn about important characteristics of Haiku icons, e.g. perspective, shadows and the Haiku color palette.
Bisognerebbe sempre tentare di non abusare dell'utilizzo dei percorsi che risultano essere piuttosto costosi in termini di dimensione dei file. Riutilizzare i percorsi ove possibile e lavorare con forme manipolate o con i loro trasformatori. Si può risparmiare spazio con un uso adeguato dei gradienti.
Wherever possible, you should activate Snap-to-Grid from the menu when editing paths. Path points that align with the 64x64 pixel grid use less storage space. You'll also get the crispest look if points are set on exact pixel borders. For example, it is important to align the most prominent outlines with the 16x16 grid.
Controllare l'anteprima per verificare che l'icona 16x16 si veda ancora bene. Volendo, è possibile utilizzare le impostazioni del Livello di dettaglio descritte nella sezione delle Forme.
There's an easy way to produce letters, even if Icon-O-Matic doesn't provide such a tool. Just enter the text in a text editor such as StyledEdit, adjust font type and style, and drag & drop or copy & paste the selected text into Icon-O-Matic. This will create the according paths and shapes.
If you assign more than one path to a shape, their overlapping areas will cancel each other out. When one path is completely inside another, it practically creates a hole in the resulting shape.
You can zoom in and out of the canvas with the mouse wheel. Panning is done either by click & drag with the middle mouse button or with a normal left-click & drag while holding SPACE.