


Accelerant
4. Accelerant
As opposed to the kernel driver, the accelerant runs in user space. The accelerant provides functions that are needed to control a graphics card. These functions are used by the app_server and/or applications directly. There are a number of reasons for the graphicsdriver being divided into a kernel- and userspace part:
-
Speed: When controlling the graphics card configuration (so programming the ‘registers’) is done using memory mapped I/O this can be done using pointers. This works much faster than doing a single I/O in kernelspace per register access. The context switch which has to be made then (twice per single I/O!) costs a lot of time. Especially when tens to hundreds of accesses need to be done this will slow things down considerably. (In theory the speed can be increased by sending lists of registers to the kerneldriver at once as this will minimize the number of context swiches, but this adds complexity considerably also.)
-
Stability: A user program cannot make the system crash: a kernel space program however can. If the accelerant messes things up the app_server might go down. However access to the system remains functional using for instance a network connection to the system with telnet or ftp. At least one instance of the accelerant is loaded for each published name from the kernel driver. This way a single kerneldriver can support multiple cards it detected simultaneously. All loaded accelerants control their own graphicscard using communication with that single instance of the kerneldriver. The accelerant/driver ‘sets’ all work independently: variables inside the kerneldriver need to be seperated for each supported device (using arrays for example).
-
Debugging: By separating the code into two parts, we can more easily add features to the driver over time, and see what impact our changes have on the system more easily. If something goes wrong, it’s far easier to narrow down the offending piece of code, then wading through one gigantic set of code. Plus, it further refines the coding style, as it were, in case other programmers take a peek at how things were done.
At least one instance of the accelerant is loaded for each published name from the kernel driver. This way a single kernel driver can support multiple cards it detected simultaneously. All loaded accelerants control their own graphics card using communication with that single instance of the kernel driver. The accelerant/driver ‘sets’ all work independently: variables inside the kernel driver are separated for each supported device (using arrays for example).
When needed, a second or later instance of the accelerant (called a ‘clone’) can be loaded for a graphics card for which already a first (‘original’) accelerant was loaded. A clone has the same information (called ‘shared info’) as the original accelerant. ‘Shared info’ was created by the kernel driver to be later on shared with all accelerants using this kerneldriver for the graphicscard this shared info belongs to. The original accelerant largely fills in the shared info it got from the kerneldriver. Via the kernel driver this information is also visible for all clones for the same graphics card the original accelerant is controlling. Both original accelerant and clones create their ‘own’ cloned ‘copy’ of the shared info so they can all access it in their own adress space. When something is read from, or written to this cloned area actually the original shared info as created by the kernel driver is accessed: which is the way all driver parts (kernel driver, original- and cloned accelerants) can control and use the same shared information.
When a second kernel driver would be loaded for another graphics card: so that card is not supported by the first kerneld river, in theory a matching accelerant would be searched for by the system.
When the system is booted, a kernel driver will be loaded for each and every graphics card found in the system (if all cards have a BeOS driver that is). But because the BeOS currently only supports a single graphics card with a single screen per system, only one ‘original’ accelerant will be loaded by the app_server for a ‘randomly’ chosen loaded graphics kerneldriver. Not entirely random though, it selects the first found kernel driver via their more or less alphabetically ordered exported names.
An accerant clone is not much used in practice. A clone could for instance be used for controlling a second screen on the first single graphicscard in a system, for instance by a video consumer node: used for independent showing motion video on a reserved videoport on the graphicscard.
The application server (‘app_server’) is the BeOS part which among other things loads the accelerant and sets up the workspace. A second instance of the app_server in theory could load a clone for the first graphicscard, or a original accelerant for a second graphicscard, and show a workspace on a second screen.
The figure below shows another example of a theoretically possible configuration.
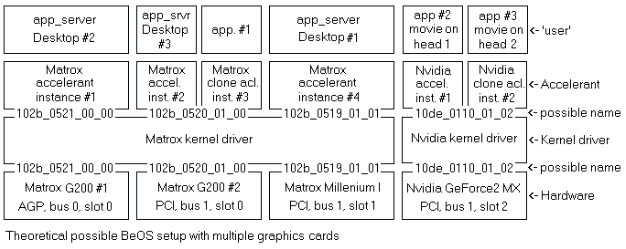
In this picture you can see an example configuration with four graphicscards is a system: One AGP card and three PCI cards. The three Matrox cards are all supported (and so: controlled) by the same instance of one single kerneldriver. Difference is made via the exported names setup for the cards which all contain the manufacturer ID, card ID, system's busnumber, and slotnumber in the bus.
For the Matrox cards four instances of the exact same accelerant are loaded, while for the Nvidia card two instances of the belonging accelerant are loaded. (Theoretically even different accelerants could be used for different cards supported by a single kerneldriver.)
In this case three different desktops are shown on the three Matrox cards, while the Nvidia card is only used for showing two different fullscreen movies simultaneously. One on each screen of this dualhead kaart (Nvidia calls this ‘twinview’ on the card used here). The applications showing these movies could be video consumer nodes here for example. Furthermode one application has loaded an accelerant clone for the PCI G200, probably for tweaking or showing additional info to the user about the state the card is in. A very usefull example could be reading the fan speeds, temperatures and voltages on the card, though there is no accelerant hook defined (yet) which supports collecting this type of info from the card.
Note to this chapter: Extra notes have been attached to the descriptions of various accelerant functions further down this chapter. These notes concern experiences gained by the author when working with these functions. Sometimes incompleteness or defects of the API are mentioned here. Also errors or incompleteness in the BeOS R4 Graphics Driver Kit are discussed here.
4.1 The accelerant hooks
Hooks that are not implemented in the accelerant are not exported by the accelerant. Instead it returns a null pointer for every unsupported hook. Beware: Except where noted, hooks will not be requested again after a modeswitch! One of the two hooksB_INIT_ACCELERANT or B_CLONE_ACCELERANT is requested and executed by the
app_server (or application) before any other hook will be requested. All other ‘feature’ hooks can be existing or
non-existing (so: null) depending on variable values during the accelerant's initialisation process and of course
depending on the availability of a requested function in the card's hardware.
The BeOS R5 supports the following hooks:
Initialization:
- INIT_ACCELERANT
- CLONE_ACCELERANT
- ACCELERANT_CLONE_INFO_SIZE
- GET_ACCELERANT_CLONE_INFO
- UNINIT_ACCELERANT
- GET_ACCELERANT_DEVICE_INFO
- ACCELERANT_RETRACE_SEMAPHORE
2018 update: Haiku has added support for the DDC/EDID channel which is used to determine the specifications of a screen connected to the graphicscard. This information is (for instance) shown in the Haiku Screen Preferences app. The hook we are talking about is:
GET_EDID_INFO
Based on the info from the DDC channel the driver can also specify to the app_server which mode is the ‘native’ (or best) mode to use for the connected screen. Sometimes the preconfigured state of the graphicscard hardware at boottime (partly) determines this, especially when part of the hardware register programming info is missing as that limits the options for the driver. The new hook is:
GET_PREFERRED_DISPLAY_MODE
Also added by Haiku are two hooks to get and set the screen’s brightness. This will (mostly) be used for controlling laptop panels brightness.
- GET_BRIGHTNESS
- SET_BRIGHTNESS
Mode configuration:
- ACCELERANT_MODE_COUNT
- GET_MODE_LIST
- PROPOSE_DISPLAY_MODE
- SET_DISPLAY_MODE
- GET_DISPLAY_MODE
- GET_FRAME_BUFFER_CONFIG
- GET_PIXEL_CLOCK_LIMITS
- MOVE_DISPLAY
- SET_INDEXED_COLORS
- GET_TIMING_CONSTRAINTS
Powersave functions:
- DPMS_CAPABILITIES
- DPMS_MODE
- SET_DPMS_MODE
Cursor management: The cursor management hooks are only exported when the accelerant and the card both support a hardware cursor.
- SET_CURSOR_SHAPE
- MOVE_CURSOR
- SHOW_CURSOR
2018 update: While the (older) BeOS hooks are still supported in Haiku, Haiku also has added support for full color cursors. When Haiku’s app_server determines which type of cursor to use, it will first try to use the new full color hardware cursor. Assistance with writing graphics card drivers for the BeOS. By Rudolf Cornelissen - 22 If that isn’t supported, it will try the old type hardware cursor of which the hooks are mentioned directly above. If that also fails, it will fallback to use a software emulated cursor inside the app_server itself. One hook was added to add full color support:
SET_CURSOR_BITMAP
Acceleration engine synchronization:
- ACCELERANT_ENGINE_COUNT
- ACQUIRE_ENGINE
- RELEASE_ENGINE
- WAIT_ENGINE_IDLE
- GET_SYNC_TOKEN
- SYNC_TO_TOKEN
2D acceleration: The first four 2D hooks are used by the app_server. All hooks can be used by applications via BwindowScreen for example.
The 2D hooks are requested (again) by the app_server after every single modeswitch, also applications need to do this when they use the hooks directly. This way, depending on the engine’s architecture, a different function can be used per mode to execute the acceleration function. For instance a quite different setup may be needed per different colordepth.
Also, it is possible to block a function by not returning a hook in some mode(s) at all. In such a case it’s required that the app_server or application does the work by itself (so in software). An ‘everyday’ example for this happening is when a virtualscreen is setup, where it’s size is too big to still execute blits for example because the ‘line length’ (left to right in memory) is too big to specify to the hardware. So the acceleration engine simply does not support the mode, while the mode itself is supported. This can happen, because the memory reading hardware for the CRTC/DAC hardware is a different hardware block from the acceleration engine in the GPU.
- SCREEN_TO_SCREEN_BLIT
- FILL_RECTANGLE
- INVERT_RECTANGLE
- FILL_SPAN
- SCREEN_TO_SCREEN_TRANSPARENT_BLIT
- SCREEN_TO_SCREEN_SCALED_FILTERED_BLIT
Hardware overlay: For the hardware overlay functionality the following hooks are used. Depending on engine architecture different functions may be needed for different colordepths. Also, the overlay engine possibly won’t support all possible modes that can be setup in the card. Therefore the overlay hooks below are requested after every single modeswitch! It is allowed to export all hooks, or no hooks at all: nothing in between. This way the accelerant lets the user know the current set mode on this card (or head) supports overlay or not.
- OVERLAY_COUNT
- OVERLAY_SUPPORTED_SPACES
- OVERLAY_SUPPORTED_FEATURES
- ALLOCATE_OVERLAY_BUFFER
- RELEASE_OVERLAY_BUFFER
- GET_OVERLAY_CONSTRAINTS
- ALLOCATE_OVERLAY
- RELEASE_OVERLAY
- CONFIGURE_OVERLAY
The most important hooks are discussed one by one in the following paragraphs.
4.1.1 INIT_ACCELERANT
This hook is called first, so before any other hook is called. It will ask the already loaded kerneldriver for it's shared_info struct and make a clone of it for it's own use. If that fails (because the kerneldriver does not belong to this accelerant) then it will abort and report the error. Upon success the graphicscard will be initialized. This means the card will be taken through a 'coldstart' or a 'warmstart' cycle. The location in graphics memory which is going to hold the visible framebuffer, and the location which is going to hold the (optional) hardware cursor bitmap are determined. Needed semaphores are created and all other variables are initialized.
The accelerant will setup a modelist which is supported by this particular graphicscard with the particular screen now connected. This list will be made accessible via the shared_info struct. The maximum possible modelist for the driver is integrated in the accelerant’s code, and is validated internally using the user hook PROPOSE_DISPLAY_MODE. This way the resulting actual modelist for the current hardware setup is generated. Apart from the screen’s specs, for instance the maximum DAC (or serial monitor link, LVDS) speed and the available size of graphics memory have a large influence on the actual supported modes.
The BeOS app_server requires at least one mode per resolution in the modelist in order to correctly activate it’s screen preferences panel with resolutions to select from. If a mode is missing, the belonging ‘standard’ resolution will be greyed out. Multiple modes per resolution can exist: there can be different colordepths, refreshrates and screen timing setups (varying relative place and length of the horizontal and vertical synchronisation pulses for example). The modelist can later-on be obtained from the accelerant using it’s own hook for that so the list can be used as a reference. This is also they way the app_server obtains this list.
Remarks:
Two things need to be done in a different way when compared to what the R4 graphics driver kit advertises, when creating the supported display_mode list in the internal function create_mode_list():
-
Implicitly the kit says that for some hardware a larger pitch (distance between two ‘lines’) is sometimes needed to be able to generate a mode. The author ‘says’ this needs to be specified using the ‘virtual_width’ item: This is wrong however. The so called ‘slopspace’ which is meant here should be specified in ‘frame_buffer_config.bytes_per_row’ instead. Only this way the app_server will correctly use the slopspace: in the other case a virtual screen is generated in which can be ‘panned’!
-
The way ‘Propose_display_mode’ is called is not entirely correct. While a margin is correctly offered to Propose_display_mode for the requested pixelclock, the calling code does not check afterwards if the mode can be made within the specified limits. Instead of using the returned mode when ‘Propose_display_mode’ does not return B_ERROR status, it should only be used if this function returns B_OK instead.
2018 update: Haiku has a new and improved screen preferences app when compared to the BeOS. These days it doesn’t grey out non-existing standard (4:3) resolutions anymore for instance, but it simply populates the app with the modes supported by the driver. Therefore these days for instance widescreen modes can be set with it. No need for a custom screen preferences panel for this anymore.
4.1.2 CLONE_ACCELERANT
In case the driver and accelerant are already in use when an(other) application for example wants to load the accelerant for itself, this will be done using the CLONE_ACCELERANT hook. Because the card hardware was already initialized before not much has to be done here.
First the hook will open the kernel driver (so for a second or later time). After this the hook will ask the kerneldriver for its shared_info which will be cloned. Then the already before created modelist will be cloned.
4.1.3 UNINIT_ACCELERANT
When the current accelerant is the original one this function will destroy the semaphores the accelerant uses, along with the cloned shared_info and the mode_list. If the current accelerant is a clone, only the cloned shared_info and mode_list will be destroyed after which the kerneldriver will be closed.
4.1.4 ACCELERANT_RETRACE_SEMAPHORE
This hook only returns the semaphore the kerneldriver created for the function of synchronizing code with the screen's vertical retrace, important to be able to show tearfree moving video for example. If software wants to sync, it needs to lock the semaphore. This will not succeed until the kernel driver releases this semaphore because it's vertical retrace interrupt routine is executing. When the software gets the lock it can immediately release it again and execute the screen's memory update that needs to be synced.
4.1.5 ACCELERANT_MODE_COUNT and GET_MODE_LIST
ACCELERANT_MODE_COUNT returns the number of graphics modes the MODE_LIST contains (which list was created during the initialisation phase of the ‘original’ accelerant by this same accelerant). The application (or for example the
app_server) intending to retrieve the mode_list, should make sure it has the memory space needed to hold this list
which is later on retreived by calling hook GET_MODE_LIST.
Remark: The list as exported is used by the BeOS Screen Prefs panel to ascertain if the resolutions and colordepths in this panel are supported by the graphics driver. If for a certain resolution and colordepth more than a single display_mode exists, these modes will have varying (modeline) timing and/or refreshrates. Whenever using the screen preferences panel the user switches between refreshrates while the exact matching mode does not exist in the mode_list, this application will in an adaptive way (by interpolating) put together modes itself from the modes in the list directly ‘above’ and ‘below’ the requested refreshrate. This way support for a broad range of screens on the market is guaranteed.
4.1.6 PROPOSE_DISPLAY_MODE
Propose_display_mode determines if the display_mode given to it can be set by the driver. When this is not the case, the accelerant will adapt the mode to become the 'closest' mode that is possible to set. Aside from this the accelerant will compare the modified mode to the also given limits 'high' and 'low'. By letting an application set custom limits with a certain mode this application can check if this mode can be set within the desired limits. The (user) application should make correct use of this limit checking feature: When Propose_display_mode should not check for limits, the application can create a single display_mode and feed this same mode three times to the Propose_display_mode hook (using the three pointers for 'mode to check', 'limit low' and 'limit high'). Since the limits will now be adapted by the accelerant (indirectly) the just modified mode by the accelerant will always be within the limits it sees.
Remarks: The BeOS API class BWindowScreen uses Propose_display_mode via its function WindowScreen.SetFrameBuffer() to determine if a requested virtual size can be made for a previously set display_mode. Unfortunately the BeOS uses Propose_display_mode in a dangerous way here: The BeOS should come up with limits that allow for some variation in most items in the display mode except for the virtual size members virtual_width and virtual_height, because only those two items should be checked.
The BeOS does not use it that way: In the current situation Propose_display_mode will let it know it cannot make the mode within the requested limits if for instance the pixelclock deviates only 1kHz. Which is a deviation that often occurs because of graphicscard hardware restrictions (in the PLL systems). Assistance with writing graphics card drivers for the BeOS. By Rudolf Cornelissen - 25 Please note that the display_mode is already set at the time the BWindowScreen object is created. So the mode can be made per definition aside from the changes in virtual size, requested via the SetFrameBuffer() function afterwards.
It is important to recognize that during creation of the BWindowScreen object a Set_display_mode command is given to the accelerant. This command is supposed to set the mode if at all possible. Potential adaptations to the mode while setting can not be reported back to the calling program, therefore a small deviation in for example the set pixelclock is not known there either. While this small adaptation has no influence on the mode at all (1kHz compared to 50Mhz pixelclock is a deviation of 20 parts per million!), BWindowScreen.SetFrameBuffer() will be told via
Propose_display_mode about this deviation causing it to fail and exit with an error… As a temporary solution (workaround) to this problem the accelerant’s way of executing the Propose_display_mode function can be changed to not report small deviations outside of the given limits back to the calling program, except in:
- virtual_width;
- virtual_height;
- timing.h_display;
- timing.v_display.
4.1.7 SET_DISPLAY_MODE
Set_display_mode should activate the mode given to it, unless it cannot be done 'in any way'. Small deviations should be accepted by changing the mode so it will work. This shows from the fact that this function should validate the mode internally by (in turn) calling Propose_display_mode, while also the Set_display_mode command only aborts upon hard faults during execution of Propose_display_mode. Here Propose_display_mode is not used to check for deviations, it now only checks for ‘hard’ faults.
Remark: Unlike as is shown in the R4 graphics driver kit, Propose_display_mode can best be called with three pointers to the display_mode ‘target’ to in effect disable limit checking. The illogical manner of using a single(!) display_mode called ‘bounds’ holding a copy of ‘target’ is not advisable.
4.1.8 GET_FRAME_BUFFER_CONFIG
This function returns the 'fbc' struct belonging to the currently active display_mode to the caller. This fbc struct contains information which actually belongs inside the display_mode itself, since it is indispensable to correctly handle a display_mode. The app_server therefore uses this information to be able to correctly use the set display_mode. fbc.bytes_per_row tells you the number of bytes that a display line is long, being a single pixel in height. The difference between '(display_mode.virtual_width * bytes/pixel)' and 'fbc.bytes_per_row' is the slopspace the current mode needs to have to function on the current graphicscard hardware. Slopspace is the non-used space to the right of the screen ('scrap paper '). This is the difference between: - the requested width in pixels for the screen, and - the needed width to comply to the graphicscard hardware restrictions for this.
Remark: Different parts of the graphicscard (chip) often have different restrictions:
-
CRTC-timing (control of the screen) usually needs visible widths dividable by 8;
-
CRTC-memory access (for fetching pixel information that is i.e. fed to the DACs) needs a specific pitch between the different horizontal lines depending on the colordepth, because the hardware functions with a fixed number of bytes per ‘fetch’ (as in: uses batches, for i.e. electronic design simplicity and/or speed reasons: the size of the batches (also) depends on the buswidth to/from graphics RAM). For instance Matrox Millenium cards need a pitch which is dividable by 128 bytes, while Matrox G100 and later cards just need 16 (in 8bit color this means 16 pixels, while in 32bit color this means just 4 pixels) 11, 12; Assistance with writing graphics card drivers for the BeOS. By Rudolf Cornelissen - 26
-
The acceleration engine has its own limits which must be dealt with. Matrox G100 and newer cards work here with a 32 pixels width, so independant of the colorspace in use! In order for the graphicscard hardware to be able to accomodate a lot of (custom) horizontal resolutions in graphicsmodes, slopspace is needed. Horizontal resolutions dividable by 8 (pixels) are doable most of the time!
4.1.9 GET_PIXEL_CLOCK_LIMITS
This function returns the minimal- and maximal possible pixelclock for the given display_mode. The BeOS Screen preferences panel for instance uses this function to setup the lower- and upper limits for its refreshrate slider. Also predefined refreshrates (i.e. in a list) can be greyed out or disabled if after calling this function it's determined they cannot be done. In the graphicscard hardware the maximum pixelclock will in most cases be dependant upon the colordepth chosen. The maximum pixelclock depends on: - the maximum speed the DAC can cope with (so in Mhz); - the speed the graphics chip 'core' is set to (mostly set to a fixed speed: although sometimes the speed depends on the kind of graphics mode in use: i.e. 2D/3D use, 'standard' VGA or 'extended' modes, single or dualhead modes); - the graphics RAM speed (clockspeed) in combination with it's memory bus width (in bits, i.e. 128, 256 or 512 bits wide). In modes with low colordepth mostly the maximum DAC speed can be set, while for higher colordepths the bottleneck suddenly becomes the RAM speed. This means that the maximal possible refreshrate is lower using higher colordepth modes than it is with lower depth modes. When going beyond the maximum speed (by 'overclocking') as specified by the manufacturer, overheating with destruction can occur as a result. As a intermediate result it's possible that the card remains functional, but at a definite lower max. spec, going lower on each spec violation that occurs. When going beyond the 'maximum' speed (by relatively 'underclocking') you'll see the same symptoms as with overclocking but in this case it's mostly non-destructive for the card's hardware. When the (currently set) maximum RAM-fetching spec is violated it's very well possible that you can clearly see it happening: there will be malfuncions visible. For example: - a fixed, green color on the pixel-'spots' where data is missing; - you will see the screen through 'white snow' which is moving across the screen; - you will see repeating pixels to the right (as the screen is 'built' in time from left-to-right and top-to-bottom). The card's RAM's data is not only fetched from it for displaying it onscreen. This RAM is also accessed by write actions from the computer (program) by DMA or CPU or GPU (accelerated) access. Furthermore if it's dynamic RAM (so non-static RAM) also refresh cycles are happening regularly. This means that the max. possible fetching speed is reached a bit earlier than you might think when 'designing' your hardware setup for a certain mode. Some card types have a caching mechanism which you need to program explicitly for a certain strategy for dealing with all these concurrent accesses in order to get the best from the card. If you neglect to program this (or the specs are simply missing..) you'll have more limited modes at your disposal to choose from than is otherwise possible. Remarks: A remark about the BeOS Screen preferences panel behaviour: This application shields the user from setting very high refreshrates. As long as a mode can be done beyond 90Hz the upper settable limit will be fixed at 90Hz. The driver's influence only becomes visible here when 90Hz nolonger can be done. Oddly enough such a restriction does not exist at the low end. If the driver says 4Hz is doable, the panel will simply indicate this.
It’s because of this kind of (possible) behaviour in apps interfacing with the driver that it’s advised to set decent limits yourself within the driver. The lowest setting should be limited around some 48Hz, because too low refreshrates can destroy your user’s (cheap) screen just as good as too high refreshrates can.
Assistance with writing graphics card drivers for the BeOS. By Rudolf Cornelissen - 27 Luckily these days every screen has it’s own sanity checks built-in, which makes it shut-down automatically when being sent signals outside of it’s designed specs. Or, as a lot of screens do these days, a ‘out of range’ message is displayed on the screen instead of the mode sent to it by the computer. (48Hz is being mentioned as lower limit value because if someone would want to display PAL television output then 50Hz refresh might come in handy..)
A second remark about the BeOS Screen preferences panel: This panel (in R5) contains an error: This application should ask for the pixelclock limits for the suggested display_mode as is visible in the panel, so not for the limits of the currently active display_mode like it is now. That would make the result much more logical to deal with for the user..
4.1.10 MOVE_DISPLAY
Move_display is used for virtual screens. Such screens have a resolution beyond the resolution currently showing on the monitor. Using the move_display function it's possible to move the visible area in position around the complete virtual screen area (as a 'viewport' to it) by panning (horizontal movement) and scrolling (vertical movement). Please keep in mind that on some hardware modifying the starting adress pointer to the visible part of the (virtual) screen requires synchronisation with the screen's vertical retrace event. These cards do not contain double buffered hardware registers which automatically copy their content to the really active register(s) all at once after updating all user accessible (so 'shadow') registers in a specific order is done. In such a case the driver needs to wait for the start of the vertical retrace before updating the starting adress registers because otherwise visible distortions will happen when moving the viewport position. Retrace synchronisation can be accomplished here by polling a (standard VGA spec) register in the card's hardware for this event.
Be carefull though: the framebuffer’s starting adress (i.e.) also needs to be set during the set_display_mode command. At this time however the screen has been temporary shut-down because no mode is active (it’s in the process of being modified) so there will also not be any retrace event! A timeout counter (in a universal routine for polling this event) is necessary therefore…
-
Applications can use the Move_display function via BWindowScreen.MoveDisplayArea(), when using BWindowScreen.SetFrameBuffer() a virtual resolution being higher than the screen’s resolution has been set. This last item can only be done when BWindowScreen.CanControlFramebuffer() returns TRUE. Whether this function returns TRUE or FALSE in turn depends on the graphicscard driver. Control of this item runs via a certain display_mode flag.
-
Whenever a virtual screen is used for displaying the desktop, the move_display function is called internally directly by the accelerant from within it’s cursor control functions. Whenever the cursor is moved beyond the visible area onscreen, it will cause the viewport to follow.
Remarks: An incompleteness concerning move_display exists in the app_server. While theoretically both a hardware- and a software cursor are supported (selection is done by the driver whether or not exporting the accelerant functions for cursor control: this may differ per display_mode), software cursor support by the app_server is not completely existing.
Whenever a software cursor is active the functions inside the accelerant for the hardware cursor are not used. This is not possible since these functions don’t exist at that time outside of the accelerant itself. Inside the accelerant these functions are not useable at this time either.
This means that the responsibility of calling the move_display function in the accelerant now nolonger falls under the hardware cursor control in the accelerant itself, but under the software cursor control within the app_server. In the current BeOS version (R5) setting a virtual screen with software cursor works ok: although the viewport does not follow the cursor unfortunately.
Assistance with writing graphics card drivers for the BeOS. By Rudolf Cornelissen - 28 A second limitation with respect to this accelerant hook is this: Because the lowest few bits of the framebuffer’s starting adres often cannot be set, a minimum ‘stepping granularity’ exists for horizontal movement of the virtualscreen’s viewport. This granularity might differ per hardware, per mode (colordepth), per head even. Unfortunately the BeOS does not offer a function for applications to get information about this granularity in the API. Also there’s no accelerant hook function for this. As a result applications need to execute a trick in order to more or less make ‘sure’ the requested startadres can be set. When an exact adres is important, an application should keep the lowest three or four bits ‘reset’ (zero) at all times. The larger the number of reset low-order bits, the higher the chance that the adress will be set exactly as requested.
While the BeOS R4 Graphics Driver Kit does speak about an accelerant hook called B_GET_MOVE_DISPLAY_CONSTRAINTS which would be implemented starting with R4.1, this never happened.
4.1.11 SET_INDEXED_COLORS
This function is used to set the hardware color palette in the graphicscard that is used for the 8-bit colorspace mode.
The hardware color palette contains 3x256 bytes palette RAM, which serves as a lookup table to fetch a RGB color (24-bits) belonging to the value which is ‘noted’ as being pixeldata inside the framebuffer. So the pixels inside the framebuffer are not sent directly to the DAC, but instead serve as an index into the palette RAM. The values for R, G and B found inside that RAM at the given offset will be sent to the DAC instead. This way 256 colors can be selected from a 24-bit color ‘palette’ for simultaneous display on the screen. The pixeldata in the framebuffer serves as an index into all three palette RAMs: de same index applies for the R, G and B RAM. In higher colordepths the palette RAM is unused as the pixeldata is sent directly to the DAC now (this is called a ‘direct mode’). On some hardware the palette RAM is used for GAMMA (luminance) correction instead in these higher colordepth modes. GAMMA correction is used here to (slightly) adapt one or more of the base colors red, green and blue to correct for deviations in screen visualisation. Here the pixeldata is used again as index into the palette RAM (so ‘indirect’ mode). This time however the pixeldata for the basecolors R, G and B form seperate indexes in their corresponding color’s palette RAM. The R, G and B values retreived from the palette RAM are now sent to the DAC.
The BeOS supports indexed mode only for 8-bit colordepth. The app_server determines which colors will be used in this mode and sets them using Set_Indexed_Colors. API class BScreen only offers functions to retrieve this mapping. So it’s not possible for an application to change it. At least one important reason why app_server should select the colors which will be used onscreen, is the possible use of hardware (video) overlay. App_server should keep a single exact color inside the palette which is not used onscreen, except during use of hardware overlay: in this specific case this color is used as a ‘key’ for the card’s hardware to switch between displaying hardware ‘accelerated’ video or i.e. menu’s or other overlapping windows (‘color keying’). In order for the card’s hardware to know when to switch, app_server sends this colorkey to both the application generating the video and the accelerant (by use of function ‘configure_overlay’ for the latter).
So app_server generates the colors that should be used for filling the palette RAM in 8-bit colordepth and sends it to the accelerant directly after such a mode is set via the set_indexed_colors hook. For all other colordepths the graphics driver needs to determine by itself which colors should be placed inside the palette RAM when indirect modes are being used. Therefore the palette RAM should best be shielded from the set_indexed_colors function and so as well for the app_server when these colordepths are used.
In theory the graphicsdriver is free to offer GAMMA correction to it’s user: though the settings for such a thing are not supported by the BeOS. An alternative solution could be used though, such as using a driver settings file or so.
The downside of gamma correction use would be that the darkest and lightest colors cannot always be shown (as they would be ‘clipping’ at lowest or highest intensity) as usually there are only 256 color options for the 256 palette locations inside the palette RAM.
Assistance with writing graphics card drivers for the BeOS. By Rudolf Cornelissen - 29 Please note that for instance Matrox Parhelia cards have 10 bit DACs so this range of cards probably also has 3x 10- bit wide palette RAM with 1024 palette locations, but it (probably) still ‘suffers’ from the same type of restriction. In practice this restriction is probably of no (real) importance. On the other hand these days some screens have such a GAMMA correction option inside their own hardware already. This seems to be a more logical place for such a correction as well.
2019 update: An extension to Haiku would be thinkable adding gamma correction as a extra setting for the screen preferences panel (for colordepths other than 8-bit). Such an update would require an API function to fetch and set a GAMMA palette from/to the app_server. App_server would be able to send this table to the driver using the existing set_indexed_colors hook. The graphicsdriver needs to ‘export’ the ability to accept a GAMMA table as a flag belonging to the currently set graphics_mode, and of course it should also accept the table into it’s palette RAM if the current mode it has set supports the GAMMA correction. Because it’s thinkable that even 8-bit mode would support GAMMA correction in theory (I haven’t seen that yet though), maybe it would even be better to let the accelerant export a seperate hook especially to interface to the palette RAM for the purpose of executing the GAMMA correction.
Remarks: Some cards have a palette RAM with 3x 6-bits depth as was specified in the original VGA standard, as opposed to 3x 8-bits depth as is used nowadays. Indexing of 8-bit color mode means in this case that the 6 most significant bits should be stored in the palette RAM: the BeOS does not account for the loss of the two least significant bits. For normal use this is no problem however. When colorkeying is in use for hardware overlay it’s another story. The key as given to the accelerant by the app_server via the configure_overlay hook should now be adapted: The lowest two bits of each base-color (R, G and B) needs to be reset because we have to be sure a ‘match’ will occur! For modes with 15 (3x 5-bits depth) and 16 bits (R and B are 5 bits in depth, G 6 bits) in indirect mode there is no limitation as this bit-depth totally fits inside the palette RAM. 24-bit and 32-bit depth modes will not use the palette RAM (direct modes) so there’s no problem here either. The MagicGraph and MagicMedia graphics cards by manufacturer Neomagic13 (which are used in laptops) for example have a 3x 6-bit wide palette RAM. Because these bits are located at the 6 least significant bitpositions on the used 8-bit bus, the colordata for input to the palette RAM should be ‘shifted down’ 2 bits te get the correct effect. The Matrox G100-G550 cards for example have a 3x 8-bit palette RAM at their disposal.
4.1.12 GET_TIMING_CONSTRAINTS
This function is used to indicate the restrictions that the CRTC timing must meet. Here you can see, among other things, by which factor the horizontal timing must be divisible for valid display_modes (usually 8 'pixels'). The vertical timing usually works 'per pixel'.
4.1.13 SET_CURSOR_SHAPE
This function is used to write the bitmap data which is used to represent the cursor (mouse pointer) into the graphics card. Some (older) cards have a seperate and dedicated memory for this, while newer cards usually place the cursor bitmap in general graphics memory. The cursor bitmap is overlayed on top of the screen image in more or less the same way as playing back video using hardware overlay does. The cursor functionality is a piece of dedicated hardware inside the graphics card, apart from (one or more) video overlay engines, and apart from showing graphics memory (framebuffer) on a screen. Because changes to the shape of the bitmap can occur at any position on the screen and at any time (R5's BeIDE is notorious: the bitmap is overwritten with every single mouse move action!) it is important with some graphics cards to overwrite the bitmap only outside of the moment the cursor is being drawn onscreen. In order to do this without Assistance with writing graphics card drivers for the BeOS. By Rudolf Cornelissen - 30 too much delay or CPU time spent idling (i.e. while waiting for a vertical retrace), on most cards it's possible to ask a specific register which screen 'line' is currently in the process of being sent to the screen. If this line corresponds with a vertical position (viewport position, not a screenmemory position) on which the cursor bitmap is drawn (somewhere on the relatively fast drawn X-axis so to speak), visible distortions might occur if the bitmap is overwritten at that point in time. Sometimes it can be handy to just shut-off the cursor temporary while updating its bitmap. Because the time needed to update it is very short, the resulting flickering is often not noticeable. If the DAC and the CRTC functional blocks are placed in two seperate chips, it can become an even greater challenge: the CRTC timing signals will be your reference for the place of the cursor. A small mis-adjustment in the CRTC setup can simply make your cursor disappear because some sync puls just isn't 'seen'... Luckily on newer cards there is often a hardware provision present which solves cursor disruptions itself automatically. This is done using double buffering techniques, for example with automatic update to the front buffer at the point in time where the last (shift) register for a coordinate has been updated. Otherwise it's sometimes very tricky to get the hardware cursor functioning without distortions as you probably gathered already. Changing the cursor bitmap is used for example in a webbrowser to indicate that the cursor is hovering above a hyperlink, or in a PDF reader to indicate that the paper is being grabbed for moving when you press and hold a mouse button. 2019 update: While the (older) BeOS hooks are still supported in Haiku, Haiku also has added support for full color cursors. When Haiku's app_server determines which type of cursor to use, it will first try to use the new full color hardware cursor. If that isn't supported, it will try the old type hardware cursor. If that also fails, it will fallback to use a software emulated cursor inside the app_server itself. One hook was added to add full color support:4.1.14 Haiku only: SET_CURSOR_BITMAP
Set_Cursor_Bitmap is used to write a cursor bitmap into the graphics card in much the same way as with old hook Set_Cursor_Shape. The old hook only supports a 2-bit 'depth' type bitmap which gives only sort of a black and white type of cursor, with 'full transparancy' included by one direct value in this range of 4 possible 'colors'. The other 3 colors are 'black', 'white' and 'invert'. The new hook offers a full-color cursor including alpha channel for transparancy (so 4x 8-bit for R, G, B and A). This new hook should only be exported by the accelerant for cards and modes which support this cursor in it's hardware. Newer cards mostly support this feature, like for example more modern nVidia graphics cards. Older cards mostly only support the old type hardware cursor, if any at all: No hardware cursor on the secondary heads for Matrox G400-G550 dualhead cards, and only the old type hardware cursor on the primary heads for example. Of course transparancy is used because mostly we don't want to show a pure square bitmap on top of our screen's content, but for instance a 'hand' shape..4.1.15 MOVE_CURSOR
Move_cursor is responsible for moving the cursor to the given coördinates on the screen. Because with virtual screens the space in which the cursor can move is larger than just the visible viewport to that screen, the possibility of the cursor leaving the visible part of the screen must be taken into account. If the cursor indeed moves beyond the viewport, move_cursor should call move_display internally. If hardware overlay functionality exists in the driver, also the configure_overlay hook should be called internally in this case, with the B_OVERLAY_TRANFER_CHANNEL flag explicitly cleared: Since only the position of the overlay output window moves and there is no input bitmap switch happening here. Assistance with writing graphics card drivers for the BeOS. By Rudolf Cornelissen - 31 The reason for the need to call move_overlay is that the backend scaler does it's internal calculations referenced to the starting adress as set in the CRTC, which is not the starting adress of the virtual screen (unless by chance we have the viewport currently located at the utter left-top position of the virtual screen of course). Since move_display changes the CRTC 'reference point', we need to update the overlay output position as well. Also the calculation of the cursor position on the screen is done relative to the CRTC which is why we send the cursor hardware coördinates relative to the CRTC as well, so not the (direct) coördinates handed to us by the app_server since these are given relative to the virtual screen starting point. Since furthermore changing the cursor position is not synchronized to sending the screen's data to the monitor, it is important on some graphic card types to update the cursor position registers during vertical retrace only. This depends upon double buffering being implemented or not in the position hardware registers on the graphics card. If not and the retrace is not being waited for, the cursor might start to 'jump' across the screen, because it temporary got an incorrect coördinate: Coördinates are often spread across multiple registers, which is why you cannot update them in an atomic fashion from the perspective of the hardware.
4.1.16 Haiku only: GET_EDID_INFO
Haiku has added support for the DDC/EDID channel which is used to determine the specifications of a screen connected to the graphicscard. This information is (for instance) shown in the Haiku Screen Preferences application. This DDC communication channel sits inside the connector and cable to your screen in for example VGA, HDMI and displayport connections. It uses the I2C (Inter-Integrated-Circuit) protocol once developed by Philips, sometimes also living by the name I2S, to exchange digital information about the connected device(s). This protocol is capable of adressing multiple devices: You'll find it also on your mainboard, on your graphicscard, on your video capture card etc. to communicate with all kinds of devices like temperature sensors, rotation speed sensors and possibly controllers, voltage detection sensors, TVencoders, TVreceivers, LVDS conversion encoders etc.
For our use with this hook we only look at the I2C channel called DDC on the connection to your screen, to retreive the EDID block of information that contains a list of valid display modes for the currently connected device (screen). This list is important for (among others) helping to prevent users from being confronted with a ‘black screen’ because Haiku or the graphics driver (did) set(s) a incompatible graphics mode for this screen. Having this list in the graphicsdriver is also very helpfull when implementing the Haiku only hook Get_preferred_display_mode, which hook is described below.
Please note that Haiku has library functions that your graphicsdriver can use to be able to use the DDC protocol and retreive and interpret the EDID information block. Saves a lot of work..
4.1.17 Haiku only: GET_PREFERRED_DISPLAY_MODE
Based on the info from the DDC channel the graphics driver can also specify to the app_server which mode is the 'native' (or best) mode to use for the connected screen. Sometimes the preconfigured state of the graphicscard hardware at boottime (partly) determines this, especially when part of the hardware register programming info is missing as that limits the options for the driver (as is the case with our nVidia graphics driver when used with non- VGA connected screens). This is an important hook to implement since it can prevent the user from being confronted with a 'black screen' because i.e. the mode Haiku could otherwise start with is not supported by your currently connected screen. If this hook isn't implemented (correctly) for example trouble might arise when the user connects another screen (between boots), or when Haiku lives on a USB stick and the user takes this stick to another computer to start from it. Since that computer is probably made up of different hardware, it's very important to know the best (max) resolution that can be used in the current situation. If this resolution is below the one used last, this new best resolution will be used by Haiku instead.
4.1.18 The 2D acceleration functions
Apart from the six actual acceleration functions defined in BeOS R5 also synchronisation functions are implemented to support those. With these synchronisation functions it can be determined how many acceleration engines a card has, and a token can be aquired for an engine. This token has to be sent together with the drawing requests to the actual acceleration functions later on to let the right engine perform the actions. The six acceleration functions are called with lists of items which should be processed/executed. The names of these functions are:
-
SCREEN_TO_SCREEN_BLIT: Copy a rectangle from one place in the on(virtual)screen framebuffer to another place in this memory. This is the function which will give you the biggest acceleration effect of all. Whenever a window is being dragged, or inside a window scrolling or panning is done, this function will be used. If for instance you scroll down one text line in a text editor while the cursor was already on the last visible line, the whole content of the window apart from the top line will be copied one line upwards by the engine. This way the upper line disappears automatically, and only the new last visible line has to be drawn into graphics RAM manually by software. (So) source and destination rectangles may overlap.
-
FILL_RECTANGLE: Fill a rectangle with a single color. This function is used to set the background color of the workspace for example, after which icons and other content is being drawn on top later on. Also windows being drawn have a certain background color which will be drawn using this function.
-
INVERT_RECTANGLE: With this function a rectangle can be redrawn with the complement of its old colors. With this function is is rather simple to show a blinking selection for example. So this function reads the rectangle from the framebuffer and writes it back to the exact same spot internally using the complement color for each pixel within. If it does that twice you end up with the original content of course..
-
FILL_SPAN: This function draws a horizontal line: So two X-coordinates and one Y-coordinate is given per line. A ‘span’ can be regarded as a rectangle with a single pixel in height.
-
SCREEN_TO_SCREEN_TRANSPARENT_BLIT: This function is not used by the BeOS app_server. A rectangle can be copied in a transparant manner inside the on(virtual)screen framebuffer.
-
SCREEN_TO_SCREEN_SCALED_FILTERED_BLIT: This function isn’t used by the BeOS app_server either.
With it you can copy a rectangle to another position inside the on(virtual)screen framebuffer. While copying, the source rectange is being scaled and filtered to prevent/minimize distortion patterns. Without the filtering function: pixels will be copied (scaling up) or dropped (scaling down), while using filtering (as this function always does) interpolation will be done instead. With this function the source and destination rectangles may not overlap. With the other functions overlap is allowed. This function can for instance be used for displaying moving video if hardware overlay is not available. In order to do it you’d need to create a virtual screen using BWindowScreen. This way the source rectangle(s) can be kept outside of the visible part of the virtual screen (so outside of the viewport area) while the destination is exactly the viewport area. You would not be scrolling and panning in this use of a virtual screen. Note: the nVidia driver Haiku has supports this function.
In theory some (most modern) acceleration engines can execute much more (variations of) functions than the BeOS uses, and on top of that also execute 3D functions. De SCREEN_TO_SCREEN_SCALED_FILTERED_BLIT function for example already uses a 3D acceleration engine function. In order to execute this function a so called ‘texture engine’ is needed: it’s 3D properties are disabled so it does the 2D function we want done here. Graphics cards for laptops and integrated graphics cards inside mainboard chipsets often (if older types, i.e. Neomagic’s) don’t support 3D acceleration. The acceleration engine ‘manual’ (if you are so lucky to be able to obtain it) usually shows exactly the functions the BeOS supports in it’s acceleration engine interface, with the exception of SCREEN_TO_SCREEN_SCALED_FILTERED_BLIT: this function cannot be done there. An(other) example for this are the Chips & Technologies chipsets for laptops like the CT6900014. Just fine chipsets for doing 2D acceleration, hardware overlay and hardcursor functions, but no 3D can be done.
Please note that you can decide per single acceleration drawing function (so: of the six mentioned above) if it will be integrated in the accelerant. Missing functions will be done in software (‘fallback’) by app_server or application software where needed. Assistance with writing graphics card drivers for the BeOS. By Rudolf Cornelissen - 33
Please also note that all acceleration functions work inside the (virtual) screen only, so not on pure ‘offscreen’ graphics memory.
2019 update: While at some point in the (now distant) past Haiku’s app_server used the driver’s accelerated drawing functions, they were later on nolonger used. These days all drawing is done by app_server in software instead (so actually by the ‘fallbacks’). The probable reasons for this decision are that these days the old bottleneck for datatransfer between main system memory and CPU to the graphicscard memory were lifted with the introduction of PCI-express (after AGP which still had that bottleneck for CPU transfers), the CPU’s are much faster now, and the acceleration interface is (very much) outdated when compared to current hardware engines. The downside is that on old systems you will notice relative slow responsiveness of Haiku when compared to the BeOS. Maybe an upside is that we would want to do accelerated desktop drawing using the 3D acceleration engines now, since these are much more available, hardware wise. Then again, since getting the needed specs from manufacturers is often not possible, it might not happen at all. Just doing old style 2D acceleration is much easier to reverse engineer than doing this for the much more complex 3D acceleration.. Example: accelerated video on a secondary graphics card. In theory you could use a secondary (etc.) graphicscard in the system (so which is not used by the app_server), then interface with it directly via it’s accelerant, to set up accelerated video. You could do this very nice in combination with a video producer/consumer node. In the years I worked on Matrox and nVidia TVout (2001-2003), Kevin Patterson wrote a BeOS media player that’s a video producer node: and he also created a video consumer node. The secondary graphics card would need to be ‘coldstarted’ by it’s driver since only the primary graphicscard is inited by the system BIOS. At least the Matrox G100-G550 driver and the nVidia driver both support coldstarting (for VGA connected screens). Now you could set a graphicsmode on this card, and see if it supports hardware overlay. If so, you could playback video using that. If not, you could see if it supports hook SCREEN_TO_SCREEN_SCALED_FILTERED_BLIT. If it does, you could use it for video playback (the nVidia driver has this function indeed, and it tested OK as well). If this function doesn’t exist either, you’d need to fallback to software rendering, or block play-back. You could grab say 4 (2x2), or 9 (3x3) graphicscards, and create a video wall with them. ‘Coldstarting’ a graphicscard using the driver is very nice to have, but it’s just one of those things that requires lots of work, and lots of specs from the manufacturer. Therefore it would be much more practical if Haiku would be able to coldstart all non-primary graphicscards by use of their ‘onboard’ BIOSes. It would need to emulate a x86 realmode computer in order to pull that off since those BIOSes are written for that mode of operation. But then again, these days Haiku already posesses this functionality since it can switch graphicscard modes on the fly via VBE2 - vesa mode. This is also a realmode type of BIOS function…
4.1.19 The Hardware Overlay functions
In BeOS R5 and later, 9 functions for overlay use are defined. The first 3 functions below Are unfortunately not used as far as known. The first two are requested by the App_server but never actually used, the third is not even requested. API access to these features is known as also not available.
Because R5 hardware overlay is supported for the first time ' experimental ‘, it is logical that the API is still is not finished, but it is unfortunate. Currently, applications have to go through a list of colorspaces and try to define an overlay bitmap to see if hardware overlay is supported: via Trial and Error SO.
When the API would be off then it would be through the first three below mentioned accelerant overlay functions very nicely Can be determined whether the driver overlay supports, and with which Colorspaces and features.
The defined overlay functions are:
-OVERLAY_COUNT: Specifies the number of OVERLAY units that the kaarthardware contains to the extent known. Op Existing drivers, this number is always one if overlay is implemented.
-OVERLAY_SUPPORTED_SPACES: Displays the names of the supported input bitmap colorspaces Aandat Supported is via a pointer to list, ending on B_NO_COLOR_SPACE. The most supported Colors pace in BeOS drivers is B_YCbCr422.
-OVERLAY_SUPPORTED_FEATURES: Indicates with flags which FEATURES are supported for the Specified supported input-bitmap colors pace. Candidates are horizontal and vertical filtering (so interpolate during scaling), mirrored view, and colorkeying methods.
-ALLOCATE_OVERLAY_BUFFER: This function is used to accommodate an input bitmap in the To reserve video memory through the construction of a BBitmap with the B_BITMAP_WILL_OVERLAY flag Put. The accelerant is expected to do the memory management itself, and determines how large the Space required.
-RELEASE_OVERLAY_BUFFER: Displays the reservation of the indicated input bitmap in the Video memory cleared: The memory is thus released for other uses.
-GET_OVERLAY_CONSTRAINTS: For the specified bitmap, this function indicates the minimum and Maximum scaling factor is, and what the minimum and maximum output window size is. The API can function calls via BBitmap. GetOverlayRestictions ().
-ALLOCATE_OVERLAY: If the OVERLAY unit is still free, a token is issued that allows the application to Receiving this token can prove that it is the owner of the overlay unit. If the unit is already busy, the Application is supposed to fall back on software output. Basically, more than one single overlay unit can be Supported by this feature.
-RELEASE_OVERLAY: Used to release the OVERLAY unit again. This function also enables the Overlay unit so that the normal output is displayed again on the screen. If an application crashes, The App_server for neat handling of current affairs.
-CONFIGURE_OVERLAY: Handles the control of the OVERLAY unit itself. The Inputbitmap which is to be displayed is indicated, that part of it which is actually (Hardware zoom), and the location and size of the Uitvoerwindow is indicated (info for Scaling is also included here. The token that the application received during Allocate_overlay is also Passed. If a mode switch takes place while the overlay unit is in use, the App_server will, before this mode switch Independently release all buffers of the application via RELEASE_OVERLAY_BUFFER. Furthermore, he will
If a mode switch takes place while the overlay unit is in use, the App_server will, before this mode switch Independently release all buffers of the application via RELEASE_OVERLAY_BUFFER. Furthermore, he will RELEASE_OVERLAY calls to disable the OVERLAY output and release the unit.
After this the actual mode switch will take place, after which the app_server automatically resets the Overlay_hooks Requesting. The app_server will again try to make buffers for the application (which in the meantime just Go through!) And then put the overlay unit back to work.
Assistance with writing graphics card drivers for the BeOS. By Rudolf Cornelissen-35 For applications This means that they are not allowed to make copies of the pointers to the buffers, because these pointers can be changed by a mode switch. The result could be that the application has a wrong part in the Video memory describes: where previously the buffers were in, it would now be a part of the visible frame buffer (the desktop) can stand.
Also, applications should consider NULL pointers when (temporarily) no buffers are available. In the Worst case, the new frame buffer is so much larger (if a higher resolution and/or color depth is chosen by the User), that there is no longer enough space for the overlay buffers. The application is expected to be switched to software output for example. It is important to note that the backend Scaler performs internal calculations with the reference point the starting address CRTC, not the start address of the virtual screen. Just as is the case with the cursor hardware. For More information about the consequences of this see the description of the accelerant function MOVE_CURSOR.
4.2 Conclusion
Most of the functionality of the video driver is in the accelerant. Only the names of the hooks actually indicate this. This accelerant interface is cleaned up, and supports the map functions for which the interface is designed well.
There is only one shortcoming in the support: the lack of the B_GET_MOVE_DISPLAY_CONSTRAINTS function for virtual screen use. If this feature were to be implemented, this feature should also indicate the following items next to the scheduled granularity for moving the screen: -The granularity of the width of the screen; -The maximum width of the screen; -The granularity of the height of the screen; -The maximum height of the screen.
The total would be six items that would make it easier to work with virtual screens than is currently the case.
The hardware overlay interface that is experimentally present in BeOS R5 looks good. As soon as full support of the available functions in the API is made, it can be pleasantly worked with.
It would be nice if BeOS next to Colorspaces’s own definitions would also know the ' industry standard ' FourCC colorspaces: The BeOS list is definitely for hardware overlay incomplete. Some colorspaces with high compression However, supported in some hardware can unfortunately not be used in BeOS. In addition, multi-platform applications (such as MediaPlayer VLC) should now perform a colors pace translation.
The BeOS colorspaces are 16bits constants defined in a 32bits word so that implementation of the fourCC definitions is not difficult. Probably both lists can be combined even without problems.
Furthermore, it can be said that the accelerant interface towards API should be further expanded to track the larger ' standard ' capabilities of the new generations of video cards.