| Index |
| File Edit Browse Image View Attributes Keyboard shortcuts |
 ShowImage
| Deskbar: | Pas d'entrée : normalement, un double clic sur les fichiers pris en charge assure le lancement. | |
| Location: | /boot/system/apps/ShowImage | |
| Settings: | ~/config/settings/ShowImage_settings |
ShowImage allows you to view images in all formats that are supported through DataTranslators. New formats are automatically recognized when their translator is added to the system. This has been done for Haiku's vector icon files, WonderBrush images or when WebP images became available, for example.
ShowImage doesn't provide editing features, but it does allow you to select a rectangular area and save it in any format. You can also rotate and flip images, but these operations don't physically change images. They only add an attribute that indicate to rotate or flip the image automatically when it's opened the next time.
Let's go through the menus in order, leaving out the obvious items.
 File
File

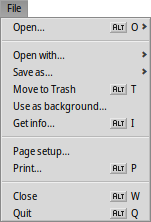
The sub-menu lists the most recently viewed images.
The lets you open the current image in any application supporting its filetype.
The sub-menu lets you choose a format to save the current image.
opens the Backgrounds preferences to quickly set the current image as backdrop of your workspace(s).
 Edit
Edit

When is activated ̵ also available with the dashed rectangle icon of the tool bar ̵ you can select a rectangular area of the image that you can then drag&drop to the Desktop or any folder to save it. Dragging with the right mouse button will show a menu when dropping the snippet that lets you choose another image format.
If you don't want to change modes first, you can create this selection frame in "normal mode" by simply holding CTRL while left-click-dragging.
or ESC will remove the selection frame.
 Browse

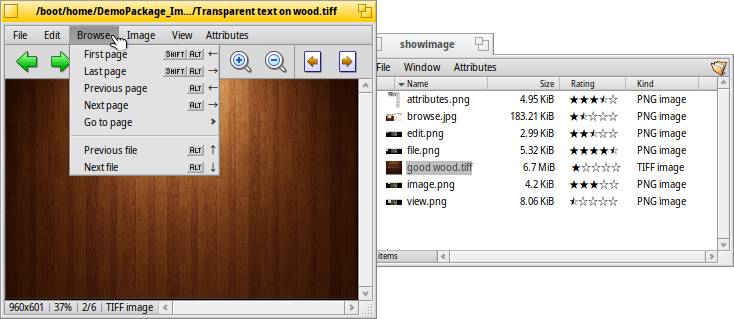
Après avoir ouvert d'une image, vous pouvez parcourir rapidement toutes les autres images du dossier (ou de la fenêtre de résultat d'une requête) en appuyant sur ↑, ↓, ← or →. Vous verrez la sélection changer en conséquence dans la fenêtre du Tracker.
There is a quick way to open the folder of the current image and even navigate to its parent and subfolders. It works just like with drill-down navigating in Tracker by clicking in the info area in the status bar that shows size, zoom level and format of the current image.
Le menu (parcourir) propose un autre type de parcours : Certains formats d'image, comme le TIFF, peuvent contenir plusieurs pages dans un fichier. Les commandes comme (Première page) et (Page suivante) vous permettent de naviguer entre ces pages.
 Image
Image

The menu offers the few image manipulations necessary for an image viewer: rotating and flipping the image.
Note however, that the actual image data won't be changed. Only an attribute is added to the file so it'll be shown rotated or flipped the next time you open it.
 View
View

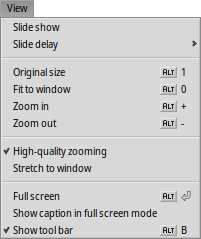
Le menu (Affichage) propose de lancer un diaporama de toutes les images d'un dossier (ou d'un résultat de requête) suivant une vitesse de défilement () de 2 à 20 secondes.
D'autres commandes s'appliquent à l'image actuellement affichée (sans changer la taille de la fenêtre) :
Taille originale () affiche l'image à sa taille réelle, sans aucun facteur de zoom.
Ajuster à la fenêtre () réduit l'image à l'espace disponible dans la fenêtre, par exemple, après avoir zoomé ou redimensionné la fenêtre.
Zoom avant () et Zoom arrière () grossit ou réduit l'image par pas de 10%. Le zoom peut aussi être effectué avec la molette de la souris.
Pour recadrer une image plus grande que la fenêtre, il suffit maintenir le bouton gauche de la souris pendant que vous la déplacer.
Two settings don't just apply to the currently displayed image and are remembered when browsing from one image to the next:
applies a very fast filter when zooming to reduce jagged lines and produce a smoother result.
will stretch smaller images to fill the current window frame.
Ensuite, il y a un mode mode plein écran () dans lequel une option recouvre l'image d'une légende affichant le nom du fichier.
Enfin, (afficher la barre d'outils) affiche ou masque les icônes de commandes :

From left to right: Previous image, next image, start slide show (in full screen mode), selection mode, original size, fit to window, zoom in, zoom out, previous and next page (when an image format like TIFF allows multiple pages in one file).
La plupart des commandes les plus souvent utilisés sont également disponibles dans un menu contextuel d'un simple clic droit sur l'image, ce qui est très pratique en mode plein écran.
 Attributes

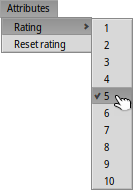
Here you can set a of the current image between 1 and 10, or choose to set it back to "unrated" (= "0").
In Tracker, ratings are displayed in a "Rating" attribute column as a number of stars. Five stars represent the 10 possible values, resulting in half-star steps. For example, a rating of 7 is shown as 7 / 2 = 3.5 stars: ★★★⯪☆.
You can edit the rating directly in Tracker as well: Select the file, choose from the menu and press TAB to get into the "Rating" column. Now you can enter the new numerical value which will turn into a star rating after hitting ENTER.
 Keyboard shortcuts
Voici une liste des raccourcis les plus utiles :
| ← / ↑ | Image Précédente | |
| → / ↓ | Image Suivante | |
| Suppr | Envoyer à la corbeille | |
| + | Agrandir | |
| - | Réduire | |
| 0 | Taille originale (100% zoom) | |
| 1 | Adapter à la fenêtre | |
| Alt Entrée | Basculer un plein écran (tout comme un double-clic) | |
| Ctrl | En maintenant la touche Ctrl enfoncée, vous pouvez créer un cadre de sélection, sans passer explicitement en mode de sélection. |